Posts

Showing posts from 2011

ESXTOP in Mac Terminal looks funky…

Image
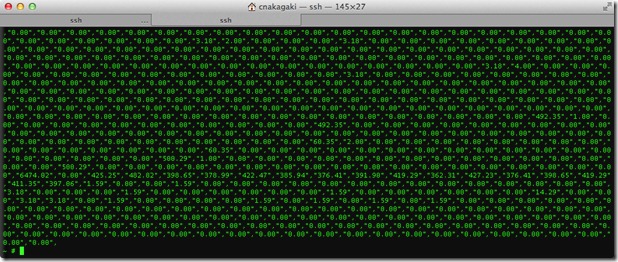
Summary: Seems that terminal in Mac is configured in a fashion where esxtop does not display properly.  Thankfully, it’s pretty easy to fix. Example: This demonstrates what you would see when accessing esxtop in a default configured terminal session: Solution: Simply change your terminal emulator session from xterm-256color to ansi, by accessing terminal’s preferences, settings, Advanced, under ‘declare terminal as:’ Open up a new terminal session, run esxtop, and you should end up w/ what looks like this:

VMWare View Powershell useful cmdlet notes.

Summary: I’m just staring to put this together mainly for my own benefit, but if someone else finds this useful, then great.  I’ll be continually adding to this post.  If you’d like to contribute or if I got something wrong please feel free to leave a comment. Notes: Disable Provisioning in all linked clone pools: $pools = get-pool $pools | Update-AutomaticLinkedClonePool -isProvisioningEnabled:$false Gets list of all View related cmdlets: get-command | where {$_.modulename -match 'vmware.view' } #Below is so you can include it into the #add-pssnapin.ps1 under your View installation directory function get-viewcommand {get-command | where {$_.modulename -match 'vmware.view' }} Gets list of pools, max number of VM's, and datastores associated: #Helps in making sure your pools are distributed across evenly among datastores. Get-Pool | Select Pool_ID, MaximumCount, DatastorePaths

SQLPSX, redirected my documents, and 64-bit Windows

Summary: These 3 things don’t really want to work together.  Three issues I’ve noticed w/ SQLPSX, but ways around them to get these awesome cmdlets to work. Based on SQLPSX 2.3.2.1 Workaround: Run the MSI installation.  It defaults to your my documents directory.  Instead redirect the installation directory to your powershell module installation directory. Usually for 64-bit: C:\Windows\System32\WindowsPowershell\v1.0\Modules\ 32-bit: C:\Windows\SysWow64\WindowsPowershell\v1.0\Modules\ These feel backwards to me, but seems to be true. Once installed, you’ll need to copy the module folders into your my documents redirected location.  You can get them from either the 64-bit or 32-bit paths above.  The folders you need to copy are as follows: SQLMaint SQLServer Agent Repl SSIS Showmbrs SQLParser adolib Once you do so, you should be able to run ‘import-module sqlpsx’ successfully.  To find out what new cmdlets are available to you, simply run the following: get-co

VMWare View 4.x/5.x (missing) entries

Summary: Stale entries in VMWare View show desktops in any of following status: Provisioning Error (Missing) Deleting (Missing) Resolution: If remove from the view admin console does not clear out the above entries within 30 min. – 1 hour, the steps in this KB from VMWare can assist in clearing out the those stale entries. http://kb.vmware.com/selfservice/microsites/search.do?language=en_US&cmd=displayKC&externalId=1008658

Cisco ASA, ESX/vSphere, and Duplicate IP’s

Summary: Windows (2003/2008/R2) and/or Linux VM’s added to a VLAN and continuously report duplicate IP’s and Windows assign themselves APIPA (Private Address). Symptoms: (Windows) 169.254.x.x Address shows up as (Preferred) when running ipconfig /all in command prompt Resetting Adapter pops up Duplicate IP Error. Changing VM Network to a dummy network and vm nic reset, causes issue to go away. Changing VM Network back to problem network clears issue until vm is reset or nic is reset. Resolution: Assuming the Cisco ASA is the cause, you can follow the below steps to rectify the issue: Login to the Security Appliance ASDM Select Device Setup Expand Routing Select Proxy ARP Disable Proxy arp on the related interface (usually associated w/ your VLAN) Other command line method: sysopt noproxyarp <interface name> If Windows is the issue for some reason, you can do this: Start –> Run… –> Regedit Find this key: HKEY_LOCAL_MACHINE\SYSTEM\CurrentControlSet\Serv

Save PowerCLI Login Credentials to XML Securely (Mostly)

Summary: PowerCLI has a cmdlet that allows you to save your logins to vCenter and ESX(i) hosts to a XML file so you can use those as reference in your PowerCLI scripts when calling the Connect-VIServer cmdlet. How to use it: #This stores your credentials into an xml file. You can open the xml file, but the password is hashed. New-VICredentialStoreItem -Host ESXorvCenterHostname -User root -Password "Super$ecretPassword" -File C:\Whateveryouwanttonameit.xml   #To use the data stored in the XML file, we will call the Get-VICredentialStoreItem and place the data into a variable for use. $Creds = Get-VICredentialStoreItem -Host ESXorvCenterHostName -File C:\Whateveryouwanttonameit.xml #Now you can use the $Cred variable for the username and password switches in the connect-viserver cmdlet Connect-VIServer ESXorvCenterHostName -User $Creds.User -Password $Creds.Password Caveats: XML files can only be referenced from the computer they were created on. Po

Disable Delayed Acknowledgement Setting in iSCSI Software Adapter using PowerCLI

Summary: Somebody posed this question in the vmware communities forum .  I figured out how to do it cheating w/ Onyx .  Not sure why this is needed (since I don’t use iSCSI much), but figure it’s best I post this for reference if I or anyone needs to do this particular task. Script: #This section will get host information needed $HostView = Get-VMHost NameofESXServer | Get-View $HostStorageSystemID = $HostView.configmanager.StorageSystem $HostiSCSISoftwareAdapterHBAID = ($HostView.config.storagedevice.HostBusAdapter | where {$_.Model -match "iSCSI Software" }).device #This section sets the option you want. $options = New-Object VMWare.Vim.HostInternetScsiHbaParamValue[] (1) $options[0] = New-Object VMware.Vim.HostInternetScsiHbaParamValue $options[0].key = "DelayedAck" $options[0].value = $false #This section applies the options above to the host you got the information from. $HostStorageSystem = Get-View -ID $HostStorageSystemID $HostStorageSystem.UpdateInt

Hardware.SystemInfo.OtherIdentifyingInfo Blank in PowerCLI

Summary: Using my PowerCLI script to get Dell warranty information, I noticed that some of my ESX hosts were not returning service/asset tag information.  The information was showing up in vCenter's hardware status tab, but not w/ my PowerCLI script. Workaround: First, check to see if your ESX host has this information populated: Connect-viServer ESXHostName $ VMHost = Get-VMHost | Get-View $ VMHost . Hardware . SystemInfo . OtherIdentifyingInfo If the above code returns objects, then the next step is to disconnect the host from vCenter, then reconnect it.  You can use the following PowerCLI code to find all hosts w/ empty properties to do this for you.  As always, test before you try it in a production environment. $ESXHosts = @()   $VMHosts = Get-VMHost | Get-View Foreach ($VMHost in $VMHosts) { $NewObj = "" | Select Name, ServiceTag, AssetTag $NewObj.Name = $VMHost.Name #Replace is used to clean up data that might be t

Get ESX Host Warranty Info for Dell Servers

[Update: This code has been updated since it appears the 'OtherIdentifyingInfo' property seems to have problem coming through to vCenter.   Click here to see updated code ] Summary: Needed to get my ESX host warranty info since we haven’t completely deployed our Dell vCenter Plugin .  Here is the code, w/ the Dell Warranty grab code from Marcus Oh .  It’ll get you some additional info too.  You can always edit and remove what you don’t need. Code: $ESXServers = Get-VMHost $ESXServerView = $ESXServers | Get-View $ESXInfo = @()   $oWeb = New-Object System.Net.WebClient   Foreach ($ESX in $ESXServers){ $TargetESXServerView = $ESXServerView | where {$_.MoRef -eq $ESX.Id} $NewObj = "" | Select Cluster, Name, Model, Version, BIOs, ServiceTag, AssetTag, ShipDate, ExpiryDate $NewObj.Cluster = $ESX.Parent.Name $NewObj.Name = $ESX.Name $NewObj.Model = $ESX.Model $NewObj.Version = $ESX.Version $NewObj.BIOs = (($TargetESXServerView.Runti

ESX/ESXi Recommended BIOs Settings

Image
Summary: Came across a PSOD on one my lab manager hosts.  The error read: LINT1 motherboard interrupt.  This is a hardware problem; please contact your hardware vendor Resolution: According to Dell, this occurs because the C1E setting is enabled in the BIOs.  This post helped me from EnterpriseAdmins.org. Finally, it’s mentioned in Page 15 of the vSphere 4.0 Best Practices Guide for recommended hardware BIOs settings.  Guess I need to work w/ Dell to do this for me before sending me an ESX Server.

NFS Datastore appears inactive in vCenter

Summary: This was more of an annoyance for me, but essentially I had two NFS datastores that were mapped incorrectly to some ESX hosts.  Those datastores were unmounted and remounted w/ correct pathing using PowerCLI .  However, one host ‘seemed’ to hold onto the incorrectly mapped one.  This was only reflected in vCenter, not the host itself. Experience: vCenter 4.1 ESX 4.0 U2 Symptoms: When attempting to unmount the following error appears: The object has been deleted or has not been completely created Connecting directly to the ESX host does not show these ‘inactive’ nfs datastores. esxcfg-nas –l within TSM/SC on the ESX host does not show these ‘inactive’ datastores. Resolution: Disconnect ESX host from vCenter Connect ESX host to vCenter. This seems to help vCenter resolve the display issue.  For help on similar NFS issues, this search seemed helpful.

EMC Virtual Storage Integrator (VSI 4.1)

Summary: Upgrading to VSI 4.1 is fairly painless if you followed my last post on 3.0.1 .  You still have to do a couple things for it to work though. PreReq: VSI Installed on server system. Reference last post for install instructions.  Overall same process. Downloaded  VSI Storage Viewer Plug-in 4.1   Record IP's, username's, and passwords of your array connections. Details: Upgrade the version on your server and upgrade the version on your system. Follow step 1 on my last post on the server.  (This is so your local system can connect to the server's solutions enabler service.) Once done, vCenter should show the new EMC VSI icon under 'Solutions and Applications' Other Optional Components: There are additional plug-ins that can be installed to allow self-service operations among other things: VSI Unified Storage Management NaviSphere CLI required for block provisioning UniSphere CLI required for VNXe provisioning VSI Storage Pool Man

ESXi 4.1 Kickstart Script for EDA Virtual Appliance

Summary: This one has been on the back burner for a little while, but I finally got it put together thanks to resources like virtualghetto .  lamw is crazy smartz! Script: Everything seems to work fine, the only one I’m not sure of is the enabling the CIMoemProviderEnabled Advanced setting as to whether that works or not.  Let me know if you happen to brave my custom kickstart script made for Dell servers, but can be adjusted for pretty much any setup I think. 1: # Bind vmnic4 to vSwitch0. EDA adds vmnic0 automatically 2: # Active/Passive 3: esxcfg-vswitch -L vmnic4 vSwitch0 4: esxcfg-vswitch -X 1 vSwitch0 5:   6: # Add vSwitch1, VMkernel, and bind vmnic1/3 7: # Active/Passive 8: # The following configures vSwitch1 as the vmKernel vmotion switch 9: esxcfg-vswitch -a vSwitch1 10: esxcfg-vswitch -A VMkernel vSwitch1 11: esxcfg-vswitch -L vmnic1 vSwitch1 12: esxcfg-vswitch -L vmnic3 vSwitch1 13: esxcfg-vswitch -X 1 vSwitch